


1. Thinking about Job Maps
One of the most powerful things you can do in Jobs-to-be-Done practice is to slow down and map out the customer’s job step by step. We call this Job Mapping.
At first glance, it might sound obvious: customers have a job, they do some steps, and they finish it. But when you actually sit down to capture those steps — in their words, free of tools or solutions — something remarkable happens. Messy interview notes suddenly become structured. Overlooked details come to the surface. Teams that used to argue about features start aligning around the flow of real customer work.
Think of a job map like a trail guide. If you’re hiking, you don’t care what brand of boots someone is wearing — you care about the route, the switchbacks, the obstacles, and the summit. A job map works the same way. It shows the path customers follow to get from “not done” to “done.” And once you can see the full path, it’s much easier to spot where they stumble, where they waste time, or where they need a better way forward.
In this article, we’ll cover the basics of Job Mapping:
What it is (and what it isn’t).
Why it’s so useful for innovation, marketing, and sales.
The eight universal steps that show up across nearly every job.
A practical workflow you can use to build a map yourself.
Tips to make your maps stronger and more realistic.
By the end, you’ll have a simple but powerful tool you can put to work immediately — one that brings clarity to customer interviews, uncovers unmet needs, and helps your team see the world the way customers actually live it.
2. What is Job Mapping?
At its core, Job Mapping is about slowing down enough to see a job the way a customer experiences it. It’s easy to get distracted by products, tools, and features — but Job Mapping asks us to set all that aside. Instead, we capture the work itself, step by step, in the customer’s own terms.
Think of it like drawing a map of a hiking trail. You don’t draw the hiker’s shoes, or the brand of backpack they’re carrying. You don’t even note which water bottle they’re drinking from. You sketch the trail: the start, the switchbacks, the obstacles, the rest stops, and the summit. A Job Map works the same way. It shows the path a customer follows to get something done — from “not done” to “done.”
A few things make Job Mapping different from other process diagrams you may have seen:
It’s solution-free. You don’t record tool actions like “click the button” or “turn the knob.” Instead, you capture what the customer is trying to accomplish, regardless of the product in their hands.
It’s in their language. You listen for verbs the customer uses — check, decide, organize, monitor — and write steps in a way they would naturally describe them.
It’s universal. A good job map works whether someone is using the latest technology, a manual workaround, or no tool at all.
Let’s make it concrete. Imagine you’re mapping the job of washing clothes. If you ask ten people to describe it, you’ll get ten different answers. One person starts with “I sort by color,” another says “I check for stains,” while someone else jumps to “I grab detergent.” Without a map, these sound like disconnected anecdotes. But when you put them into a job map, the pattern emerges:
Gather dirty clothes
Sort and inspect
Load machine and add detergent
Run wash cycle
Transfer to dryer or hang dry
Fold and put away
Notice what’s missing: there’s no mention of “pressing the start button” or “selecting cycle type.” Those are tool-specific actions. The map stays at the level of work the customer is trying to get done.
Why go through the trouble? Because customers rarely tell their story in order. They may start in the middle, skip around, or jump to a frustration point. If you capture their raw words and then map the job, you bring clarity to what first looked like chaos. Suddenly you can see the flow, the checkpoints, and the variations. And once the map is clear, you can start asking the right questions: Where are customers struggling? Which steps take too much time or create anxiety? Which steps are underserved by today’s solutions?
That’s the power of Job Mapping. It transforms scattered anecdotes into a structured picture of the customer’s work. And once you have that picture, you can align product, marketing, and even sales around it.
3. Why Job Maps are Useful
If you’ve ever sat through a round of customer interviews, you know how messy the input can be. Customers tell their stories out of sequence. They jump to pain points. They ramble. And they often assume you already know the basics. It can feel like trying to piece together a jigsaw puzzle without the picture on the box.
A job map gives you that picture. It provides a clean, structured outline of what customers are trying to accomplish, step by step, in their words. And once you’ve got that structure in place, the usefulness multiplies.
First, it brings clarity. A job map takes scattered anecdotes and turns them into an ordered flow. Everyone on your team can see the same map and agree: this is the work our customers are actually doing. No more debating whether “sorting laundry” happens before or after “buying detergent” — the map shows it.
Second, it reveals overlooked steps. Customers often skip over parts of the job when telling their story. They’ll say, “I washed the clothes,” but gloss over the fact that they had to check for stains, measure detergent, and re-run the load when something didn’t come out right. Mapping forces you to slow down and capture these hidden steps — which often turn out to be the biggest sources of friction.

Third, it aligns teams. Product, marketing, and sales often speak different languages. The product team talks features. Marketing talks messages. Sales talks objections. But everyone can rally around a customer job map. It’s neutral ground. The product team can see where to innovate. Marketing can see which steps create emotional tension to highlight in messaging. Sales can reframe their pitch to match the customer’s journey.
Finally, it’s a discovery tool. In interviews, a job map keeps you from going too shallow. You can walk customers step by step, asking: “Where do you get stuck? What’s most frustrating? What slows you down?” Instead of gathering feature wish-lists, you uncover real frictions — the unmet needs that actually drive innovation.
When you add it all up, the value is simple: a job map gives you a shared blueprint of the customer’s work. And once you’ve got that blueprint, every conversation — from innovation brainstorming to marketing copywriting to a sales call — gets sharper, clearer, and more grounded in reality.
4. The Eight Universal Steps in a Job Map
Every job — no matter the domain — has a rhythm. People start by clarifying what they’re trying to accomplish, they gather what they need, they set up, they do the thing, they check on it, they fix when it goes wrong, and they close it out.
Through years of practice and research, eight universal steps have surfaced that show up again and again. Not every job uses all eight, and some jobs compress or repeat certain steps. But these steps give you a reliable skeleton you can apply in any industry.
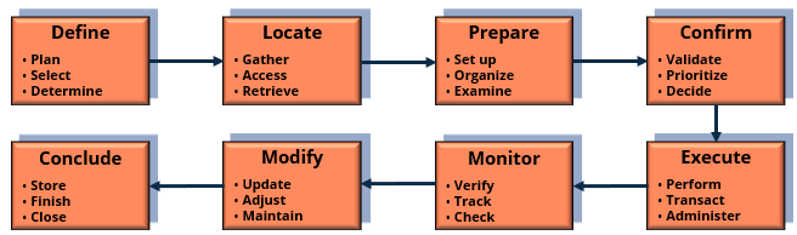
Here’s how they break down:
Define – Clarify goals, constraints, or resources.
Before any work begins, customers need to decide what they’re really trying to accomplish.
Common verbs: plan, select, determine
Example prompts:
“How do you decide what you’re trying to accomplish here?”
“What do you plan or set as priorities before starting?”
Think of a homeowner about to paint a room: they first decide on the color, the budget, and whether they’ll do it themselves or hire someone.
Locate – Gather inputs, tools, or information.
Once the goal is set, customers need to find what’s required to do the job.
Common verbs: gather, access, retrieve
Example prompts:
“What do you need to track down before you can start?”
“Are there things you often struggle to find?”
In our painting example: locating the paint cans, brushes, rollers, drop cloths, or maybe instructions they saved on their phone.
Prepare – Set up the environment or inputs.
Preparation makes the work possible. Customers organize, arrange, and stage what they’ll need.
Common verbs: set up, organize, examine
Example prompts:
“What setup is needed before you can begin?”
“How do you get things ready so the job can proceed?”
For painting, this means taping off edges, laying down drop cloths, stirring paint, and making sure ladders are steady.
Confirm – Verify readiness.
Before committing, people pause and check: “Am I really ready?”
Common verbs: validate, prioritize, decide
Example prompts:
“What do you check to make sure everything is ready?”
“What gives you confidence you can move forward?”
A painter might check that they have enough paint for the whole wall or confirm the surface is primed.
Execute – Carry out the core transformation.
This is the heart of the job: the part that actually changes the state of things from “not done” to “done.”
Common verbs: perform, transact, administer
Example prompts:
“What actions actually change the state from beginning to end?”
“What’s the heart of this job in your mind?”
For painting: applying the paint to the wall. It’s the visible, obvious step — but only one of many in the full job.
Monitor – Assess progress and results.
As they work, people check whether things are going right.
Common verbs: verify, track, check
Example prompts:
“How do you know if things are going right (or wrong)?”
“What do you watch for along the way?”
Our painter steps back every few minutes to check for even coverage, drips, or missed spots.
Modify – Adjust, correct, or resolve.
If something’s not right, customers intervene. They adjust, fix, or course-correct.
Common verbs: update, adjust, maintain, resolve, restore, fix
Example prompts:
“When things go off track, how do you correct them?”
“What kinds of changes do you usually need to make mid-process?”
In painting, this could mean wiping up a drip, reapplying paint to a patchy area, or swapping brushes.
Conclude – Wrap up or reset for next time.
Once the work is done, customers close things out.
Common verbs: store, finish, close
Example prompts:
“What do you do to finish or close things out?”
“What prepares you to start the next cycle?”
The painter cleans brushes, stores leftover paint, removes tape, and admires the finished room.
The point is not to memorize these steps. The point is to recognize that every job has a structure. These eight steps give you a mental checklist to make sure you don’t miss anything. They also give you a common language to align your team around.
And here’s the secret: when you interview customers, the richest opportunities often hide outside the “execute” step. Everyone pays attention to the doing. But the frustrations, delays, and unmet needs usually lurk in the “before” (define, locate, prepare, confirm) and the “after” (monitor, modify, conclude).
5. A Quick Workflow for Building a Job Map
At first, building a job map can feel intimidating. Customers jump around in their stories, and it’s easy to get lost in the details. The good news: you don’t need a PhD in process design to do this well. With a few simple steps, you can capture a map that’s both structured and faithful to the customer’s reality.
Here’s a workflow I’ve found useful:
1. NAME IT.
Start by defining the boundaries. Ask: What kicks this job off? How does it end? What’s the “from–to” state change?
Example: “From dirty clothes to clean clothes put away.”
This keeps the map from sprawling into unrelated work.
2. SKETCH IT.
Capture the main steps — just the big rocks that actually move the job forward. Don’t worry about finesse yet.
Example: “Gather clothes → Sort → Wash → Dry → Fold → Put away.”
3. FILL IT.
Add the “before” and “after.” Customers often forget to mention setup, checks, or wrap-up steps until you probe.
Example: “Check for stains” before washing, “Clean lint trap” after drying.
4. CHECK IT.
Look for checkpoints where people pause to confirm, monitor, or adjust. These are often invisible but critical.
Example: “Peek inside washer to see if load is balanced.”
5. TIDY IT.
Combine tiny steps. Split vague ones. Aim for 8–12 solid steps. That’s the sweet spot: detailed enough to be useful, not so bloated that no one can follow it.
6. CHECK AGAIN.
Run through a quick filter:
Does it have a clear start and end?
Are the steps framed as jobs (not tool actions)?
Is it solution-free?
Is the order logical from the customer’s perspective?
If yes, you’ve got a job map you can work with.
A tip I share with teams: don’t treat your first version as sacred. A job map is a living document. You’ll refine it as you interview customers, test ideas, and learn more. Think of it like a prototype. Each version gets you closer to the truth of the customer’s world.
6. Tips for Strong Job Maps
Building a job map isn’t just about filling boxes on a chart. The best maps feel lived in — like you’ve really stepped into the customer’s shoes and walked through their day. Here are a few tips I’ve found make the difference between a sterile diagram and a map that truly captures reality.

1. Observe jobs in context.
If you can, watch customers actually doing the job in their natural environment. There’s no substitute for this. People skip over steps when telling stories, but in context those steps become obvious. You’ll see the awkward pauses, the workaround hacks, the little checks they forget to mention.
2. Look across tools and solutions.
Don’t just observe with your product. Watch the job performed with other tools, or even without tools at all. This strips away the bias that comes from assuming your product defines the job.
3. Draft before you interview.
It’s perfectly fine to sketch a “starter” job map before you talk to customers. It gives them something to react to. They’ll correct you, add missing steps, or laugh and say, “That’s not how it really works.” That’s gold.
4. Use early interviews to evolve the map.
Think of the first few conversations as calibration. Customers will help you adjust the order, refine step names, and reveal overlooked parts. By the fifth or sixth interview, the job map will be in much sharper focus.
5. Keep versions.
Jobs evolve as you learn. Keep dated versions of your maps, so you can see the progression. Sometimes a “discarded” step comes back as important later.
6. Run the checklist.
Before calling it done, sanity-check your map:
✅ Clear start, end, and state change.
✅ Step count between 6–20 (ideally 8–12).
✅ Steps framed as jobs, not tool actions.
✅ No embedded solutions (“turn knob,” “press button”).
✅ Entirely from the customer’s perspective.
If you can check all of these, you’ve got a solid foundation to work from.
One more thought: job maps are not static. They’re working tools. You’ll use them in interviews, in workshops, and in team discussions. Expect them to get messy, marked up, and revised. That’s a sign you’re doing it right.
7. Bringing It All Together
Job Mapping is one of those tools that looks simple on paper but proves endlessly useful in practice. By laying out a customer’s job step by step — in their words, not tied to any tool — you gain clarity, alignment, and insight that scattered anecdotes could never provide.
Think of it as the backbone of customer discovery. A good job map helps you:
Cut through messy interview input.
Spot overlooked steps and hidden friction.
Give product, marketing, and sales a shared lens on the customer’s world.
Uncover unmet needs that drive real innovation.
The best part? You don’t need fancy software or an army of consultants. A pen, a whiteboard, and a willingness to listen carefully are enough to get started. Sketch the steps, refine as you go, and remember: the value is in the conversations and clarity you build along the way.
This article covered the essentials — what job maps are, why they’re useful, and how to build them step by step. In a follow-up, we’ll dive deeper into how the JTBD Pyramid™ expands the practice: applying job mapping not just to process work, but to the entire lifecycle of Product Jobs and the broader set of Core Jobs. That’s where the framework really shines.
For now, keep it simple: pick a customer job, map it out, and see what you learn. Chances are, you’ll never look at your customer’s work the same way again.
***Job Mapping is one component of the course: Customer Discovery with The Jobs-to-be-Done Pyramid. Interested? Click here to set up a call and let’s talk.